- Login to InVidiaCloud by clicking on this link.

- Enter your login email address and password, then click SIGN IN.
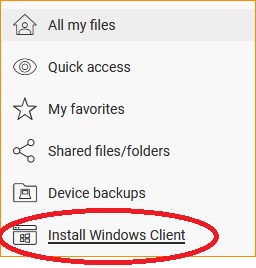
- Along the left-hand side there are several menu options. Click on INSTALL WINDOWS CLIENT
- Click on Window Client Installer 12.9.3249.52848 to download the Windows Client Installer utility. It's possible that your version number may be different than what's displayed.

- Go to your Downloads folder and double-click on the custom installer file created for you. (Note: Because this is customized for you, your filename will look different than the one shown below).

- Follow the prompts to install the Windows Client app on your PC.
- Once complete, open up File Explorer on your PC by clicking the File Explorer icon.
- You'll notice that your InVidiaCloud drive (M:) has been added to Windows File Explorer. From here, InVidiaCloud behaves just like any other drive/folder on your PC. You can:
- Drag files to the InVidiaCloud drive.
- Cut/paste files to and from InVidiaCloud drive
- Delete files from your InVidiaCloud drive
Search Knowledge Base Articles
How to Install the InVidiaCloud Windows Client on My PC
Here are the steps to installing the Windows Client on your PC.
Did you find this article useful?
Related Articles
-
How to Change Password in InVidia Cloud
Here's how to change your password in InVidiaCloudChange InVidiaCloud Password... -
How to Use Your Own Email Server to Send Outgoing Emails in InVidiaCloud
Follow these steps to update your email server to your own server. Login to InVidiaCloud In the upper-right corner is a Gear Icon. Click the Ge...