Step 1 - Open the Playback panel
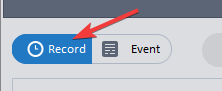
Step 2 - At the bottom-left corner of the screen click RECORD
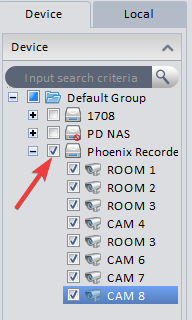
Step 3 - Select the Recorder from the list at the top-right side
Step 4 - Select a Date-Time Range
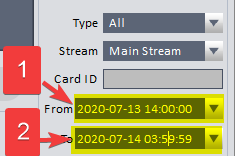
Note regarding Date-Time Range. You can select any date & time range as long as it is less than a 24 hour window.
These are acceptable date ranges because they are all less than 24 hours:
- 1 From: July 4, 2020 22:00:00 2 To: July 5, 2020 04:00:00
- 1 From: July 4, 2020 22:00:00 2 To: July 5, 2020 21:59:59
Step 5 - Use the Trim Clip feature to select your video.
To see how to use the Trim Clip function watch the video from this link here:
https://pdscrm.com/knowledge-base/article/invidia-srx-how-to-export-files-using-trim-clip
Bonus: You can use the Trim Clip feature to save shorter clips of any video file just by selecting the clip range you want to save.